一、简介
收集日志并写入至es中
二、服务器资源信息
ELK-redis (10.105)
ELK-logstash(10.106)
ELK-es01(10.102)
ELK-es02(10.103)
ELK-es03(10.104)
ELK-kibana(10.107)
三、 安装部署es集群
官方文档: https://www.elastic.co/guide/en/elasticsearch/reference/7.6/rpm.html
3.1 安装openjdk
[root@elk-es01 ~]# yum install java-1.8.0-openjdk -y
3.2 安装es镜像源
[root@elk-es01 ~]# rpm --import https://artifacts.elastic.co/GPG-KEY-elasticsearch
[root@elk-es01 ~]# vim /etc/yum.repos.d/elasticsearch.repo
[elasticsearch]
name=Elasticsearch repository for 7.x packages
baseurl=https://artifacts.elastic.co/packages/7.x/yum
gpgcheck=1
gpgkey=https://artifacts.elastic.co/GPG-KEY-elasticsearch
enabled=0
autorefresh=1
type=rpm-md

[root@elk-es01 ~]# yum install --enablerepo=elasticsearch elasticsearch
备注:要是等的难受的话直接下载rpm包
https://mirrors.huaweicloud.com/logstash/7.6.1/
3.3 elasticsearch常见重要的日志路径
/etc/elasticsearch/elasticsearch.yml # els的配置文件
/etc/elasticsearch/jvm.options # JVM相关的配置,内存大小等等
/etc/elasticsearch/log4j2.properties # 日志系统定义
/var/lib/elasticsearch # 数据的默认存放位置
3.4 集群部署
[root@elk-es01 ~]# vim /etc/elasticsearch/elasticsearch.yml
cluster.name: es-cluster                #集群名称
node.name: elk-es01                        #节点名称其他的不能和这个命名一样
path.data: /var/lib/elasticsearch        #数据存储的路径,看个人需求修改
path.logs: /var/log/elasticsearch        #日志存储的路径
network.host: 192.168.10.102        #允许访问的ip
http.port: 9200                                #启用http
discovery.seed_hosts: ["192.168.10.102", "192.168.10.103","192.168.10.104"]        #存活探测
cluster.initial_master_nodes: ["elk-es01", "elk-es02","elk-es03"]
3.5 配置hosts
[root@elk-es01 ~]# vim /etc/hosts
192.168.10.102 elk-es01
192.168.10.103 elk-es02
192.168.10.104 elk-es03
3.6 启动集群
[root@elk-es01 ~]# systemctl start elasticsearch.service
[root@elk-es01 ~]# systemctl enable elasticsearch.service
3.7 查看Elasticsearch集群状态
[root@elk-es03 elasticsearch]# curl -XGET 'http://192.168.10.102:9200/_cat/nodes?v'
备注:可以看到elk-es01为master节点
3.8 运维API
- 集群状态:
curl -XGET http://192.168.10.103:9200/_cluster/health?pretty
- 节点状态:
curl -XGET http://192.168.10.103:9200/_nodes/process?pretty
- 分片状态:
curl -XGET http://192.168.10.103:9200/_cat/shards
- 索引分片存储信息:
curl -XGET http://192.168.10.103:9200/index/_shard_stores?pretty
- 索引状态:
curl -XGET http://192.168.10.103:9200/index/_stats?pretty
- 索引元数据:
curl -XGET http://192.168.10.103:9200/index?pretty
- 查看所有索引:
curl '192.168.10.103:9200/_cat/indices?v'
四、 部署logstash
[root@elk-logstash ~]# yum install java-1.8.0-openjdk -y
[root@elk-logstash ~]# rpm --import https://artifacts.elastic.co/GPG-KEY-elasticsearch
[root@elk-logstash ~]# vim /etc/yum.repos.d/logstash.repo
[logstash-7.x]
name=Elastic repository for 7.x packages
baseurl=https://artifacts.elastic.co/packages/7.x/yum
gpgcheck=1
gpgkey=https://artifacts.elastic.co/GPG-KEY-elasticsearch
enabled=1
autorefresh=1
type=rpm-md

[root@elk-logstash ~]# yum install logstash -y
五、 部署redis
参考脚本安装地址:https://github.com/xiangys0134/deploy/blob/master/software_install/redis/redis_install.sh
[root@elk-redis conf]# systemctl restart redis-6380.service
[root@elk-redis conf]# systemctl enable redis-6380.service
[root@elk-redis conf]# systemctl status redis-6380.service
六、 部署kibana/Nginx
6.1 安装kibana
[root@elk-kibana ~]# yum install java-1.8.0-openjdk -y
[root@elk-kibana ~]# rpm --import https://artifacts.elastic.co/GPG-KEY-elasticsearch
[root@elk-kibana ~]# vi /etc/yum.repos.d/kibana.repo
[kibana-6.x]
name=Kibana repository for 6.x packages
baseurl=https://artifacts.elastic.co/packages/6.x/yum
gpgcheck=1
gpgkey=https://artifacts.elastic.co/GPG-KEY-elasticsearch
enabled=1
autorefresh=1
type=rpm-md

[root@elk-kibana ~]# yum install kibana -y
我这里使用了rpm包安装
[root@elk-kibana ~]# rpm -ivh kibana-6.8.7-x86_64.rpm
6.2 配置Kibana
[root@elk-kibana ~]# vim /etc/kibana/kibana.yml
server.port: 5601
server.host: "127.0.0.1"
elasticsearch.hosts: ["http://192.168.10.102:9200","http://192.168.10.103:9200","http://192.168.10.104:9200"]
kibana.index: ".kibana"

[root@elk-kibana ~]# systemctl start kibana
[root@elk-kibana ~]# systemctl enable kibana
6.3 安装nginx
参考安装脚本https://raw.githubusercontent.com/xiangys0134/deploy/master/software_install/nginx/nginx_rpm-1.14.sh
6.4 添加Nginx反向代理
[root@elk-kibana conf.d]# yum -y install httpd-tools
[root@elk-kibana ~]# cd /etc/nginx/conf.d/
[root@elk-kibana conf.d]# vi kibana.conf
server {
        listen 80;
        server_name elk.g6p.cn;
        auth_basic "Restricted Access";
        auth_basic_user_file /etc/nginx/kibana-user;

        location / {
        proxy_pass http://127.0.0.1:5601;
        proxy_http_version 1.1;
        proxy_set_header Upgrade $http_upgrade;
        proxy_set_header Connection 'upgrade';
        proxy_set_header Host $host;
        proxy_cache_bypass $http_upgrade;
        }
}

[root@elk-kibana conf.d]# htpasswd -cm /etc/nginx/kibana-user xunce    //输入账户密码
[root@elk-kibana conf.d]# systemctl restart nginx
[root@elk-kibana conf.d]# systemctl enable nginx
6.5 访问测试
xunce/123456
七、 agent安装
7.1 安装Filebeat
官方文档:https://www.elastic.co/guide/en/beats/filebeat/current/index.html
[root@test-zhaozheng-osp tmp]# curl -L -O https://artifacts.elastic.co/downloads/beats/filebeat/filebeat-7.6.1-x86_64.rpm
7.2 配置filebeat
[root@test-zhaozheng-osp filebeat]# vim filebeat.yml  #以下涉及多个日志抓取
filebeat.inputs:
- type: log
  enabled: true
  tags: ipb-php-logs
  fields:
    log_source: ipb-php-logs
    addr: 192.168.0.148
  paths:
    - /data/www/gmf_bms/storage/logs/*.log
    - /data/www/gmf_ipb/storage/logs/*.log
    - /data/www/gmf_oms/storage/logs/*.log
    - /data/www/gmf_rms/storage/logs/*.log
    - /data/www/gmf_utility/storage/logs/*.log
    - /data/www/xc-pms/storage/logs/*.log
    - /data/www/xc-uds/storage/logs/*.log
  multiline.pattern: '^(\d+)-(\d+)-(\d+)\s+(\d+):(\d+):(\d+)|^\[\d+-(\d+)-(\d+)\s+(\d+):(\d+):(\d+)\]|^sync start|Running scheduled command:'
  multiline.negate: true
  multiline.match: after

- type: log
  enabled: true
  tags: nginx-logs
  fields:
    log_source: nginx-logs
    addr: 192.168.0.148
  paths:
    - /data/logs/nginx/*.log

- type: log
  enabled: true
  tags: systems-messages
  fields:
    log_source: systems-messages
    addr: 192.168.0.148
  paths:
    - /var/log/messages
    - /var/log/cron
    - /var/log/secure
  multiline.pattern: '^[a-zA-Z]+\s+[0-9]{2}\s+[0-9]{2}:[0-9]{2}:[0-9]{2}'
  multiline.negate: true
  multiline.match: after
output.redis:
  hosts: ["192.168.10.105:6380"]
  db: 0
  timeout: 5
  password: "intel.com"
  key: "default_list"
  keys:
    - key: "systems-messages"
      when.equals:
        fields.log_source: "systems-messages"
    - key: "nginx-logs"
      when.equals:
        fields.log_source: "nginx-logs"
    - key: "ipb-php-logs"
      when.equals:
        fields.log_source: "ipb-php-logs"
7.3 redis验证
[root@elk-redis ~]# redis-cli -p 6380 -a intel.com keys \*
[root@elk-redis ~]# redis-cli -p 6380 -a intel.com lrange messages_secure -2 -1
八、 logstash表达式(关键)
个人认为elk stack中最为重要的就是logstash对于数据的处理
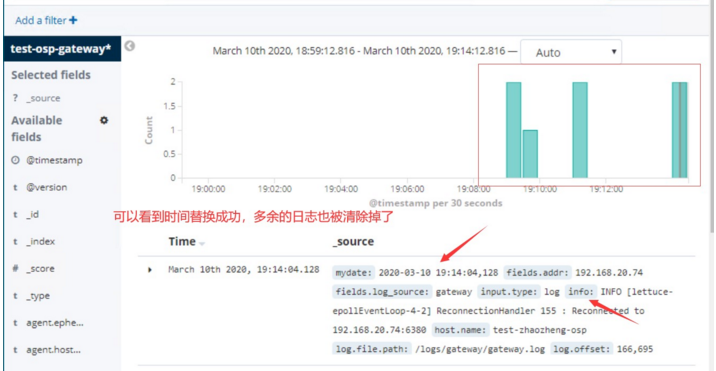
8.1 替换掉timestamp
为什么要替换?如下:
\”@timestamp\”:\”2020-03-10T09:33:30.440Z\” #日志的timestamp展示时间
\”message\”:\”2020-03-10 17:33:22,175 INFO… #真实的日志生成时间
8.2配置文件案例
[root@elk-logstash conf.d]# vi gateway.conf
input {
  redis {
    data_type => "list"
    host => "192.168.10.105"
    port => 6380
    db => 0
    password =>"intel.com"
    timeout => 5
    key => "messages_secure"
  }
}

filter {

    if [fields][log_source] == "gateway" {
      grok {
          match => {
            "message" => '(?[-0-9 :,]+) (?.*)'
          }
      }

      date {
        match => ["mydate", "yyyy-MM-dd HH:mm:ss,SSS","ISO8601"]
        target => "@timestamp"
      }
    }
}

output {
  if [fields][log_source] == "gateway" {
    stdout {
      codec => rubydebug
    }
  }
}
8.3验证
[root@elk-logstash conf.d]# /usr/share/logstash/bin/logstash -f gateway.conf
8.4 将原始数据,仅打印匹配的数据
input {
  redis {
    data_type => "list"
    host => "192.168.10.105"
    port => 6380
    db => 0
    password =>"intel.com"
    timeout => 5
    key => "messages_secure"
  }
}

filter {

    if [fields][log_source] == "gateway" {
      grok {
          match => {
            "message" => '(?[-0-9 :,]+) (?.*)'
          }
          remove_field => ["message"]
          timeout_millis => 10000
      }

      date {
        match => ["mydate", "yyyy-MM-dd HH:mm:ss,SSS","ISO8601"]
        target => "@timestamp"
      }
    }
}

output {
  if [fields][log_source] == "gateway" {
    stdout {
      codec => rubydebug
    }
  }
}
8.6 将匹配成功或者不成功的日志写入es
input {
  redis {
    data_type => "list"
    host => "192.168.10.105"
    port => 6380
    db => 0
    password =>"intel.com"
    timeout => 5
    key => "messages_secure"
  }
}

filter {

    if [fields][log_source] == "gateway" {
      grok {
          match => {
            "message" => '(?[-0-9 :,]+) (?.*)'
          }
          remove_field => ["message"]
          timeout_millis => 10000
      }

      date {
        match => ["mydate", "yyyy-MM-dd HH:mm:ss,SSS","ISO8601"]
        target => "@timestamp"
      }
    }
}

output {
    elasticsearch {
        hosts => ["192.168.10.102:9200","192.168.10.103:9200","192.168.10.104:9200"]
        timeout => 5
        index => "test-osp-gateway"
    }
}
备注:参考logstash配置文档 https://github.com/xiangys0134/deploy/tree/master/ELK/logstash
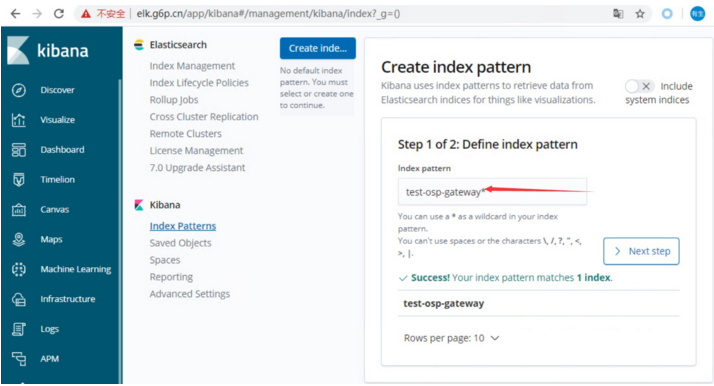
九、 集成至kibana
十、按时间删除es数据
#以下脚本仅作为一个参考,这个是很久之前的一个脚本了,看着比较low但是原理还是比较清晰的
[root@elk-es2 scripts]# cat es-index-clear.sh
#/bin/bash
#es-index-clear
#只保留15天内的日志索引
LAST_DATA=`date -d "-10 days" "+%Y.%m.%d"`
ip='192.168.10.103'
port='9200'
#删除上个月份所有的索引
curl -XDELETE "http://${ip}:${port}/*-${LAST_DATA}*"


留言