一、介绍
1.1应用介绍
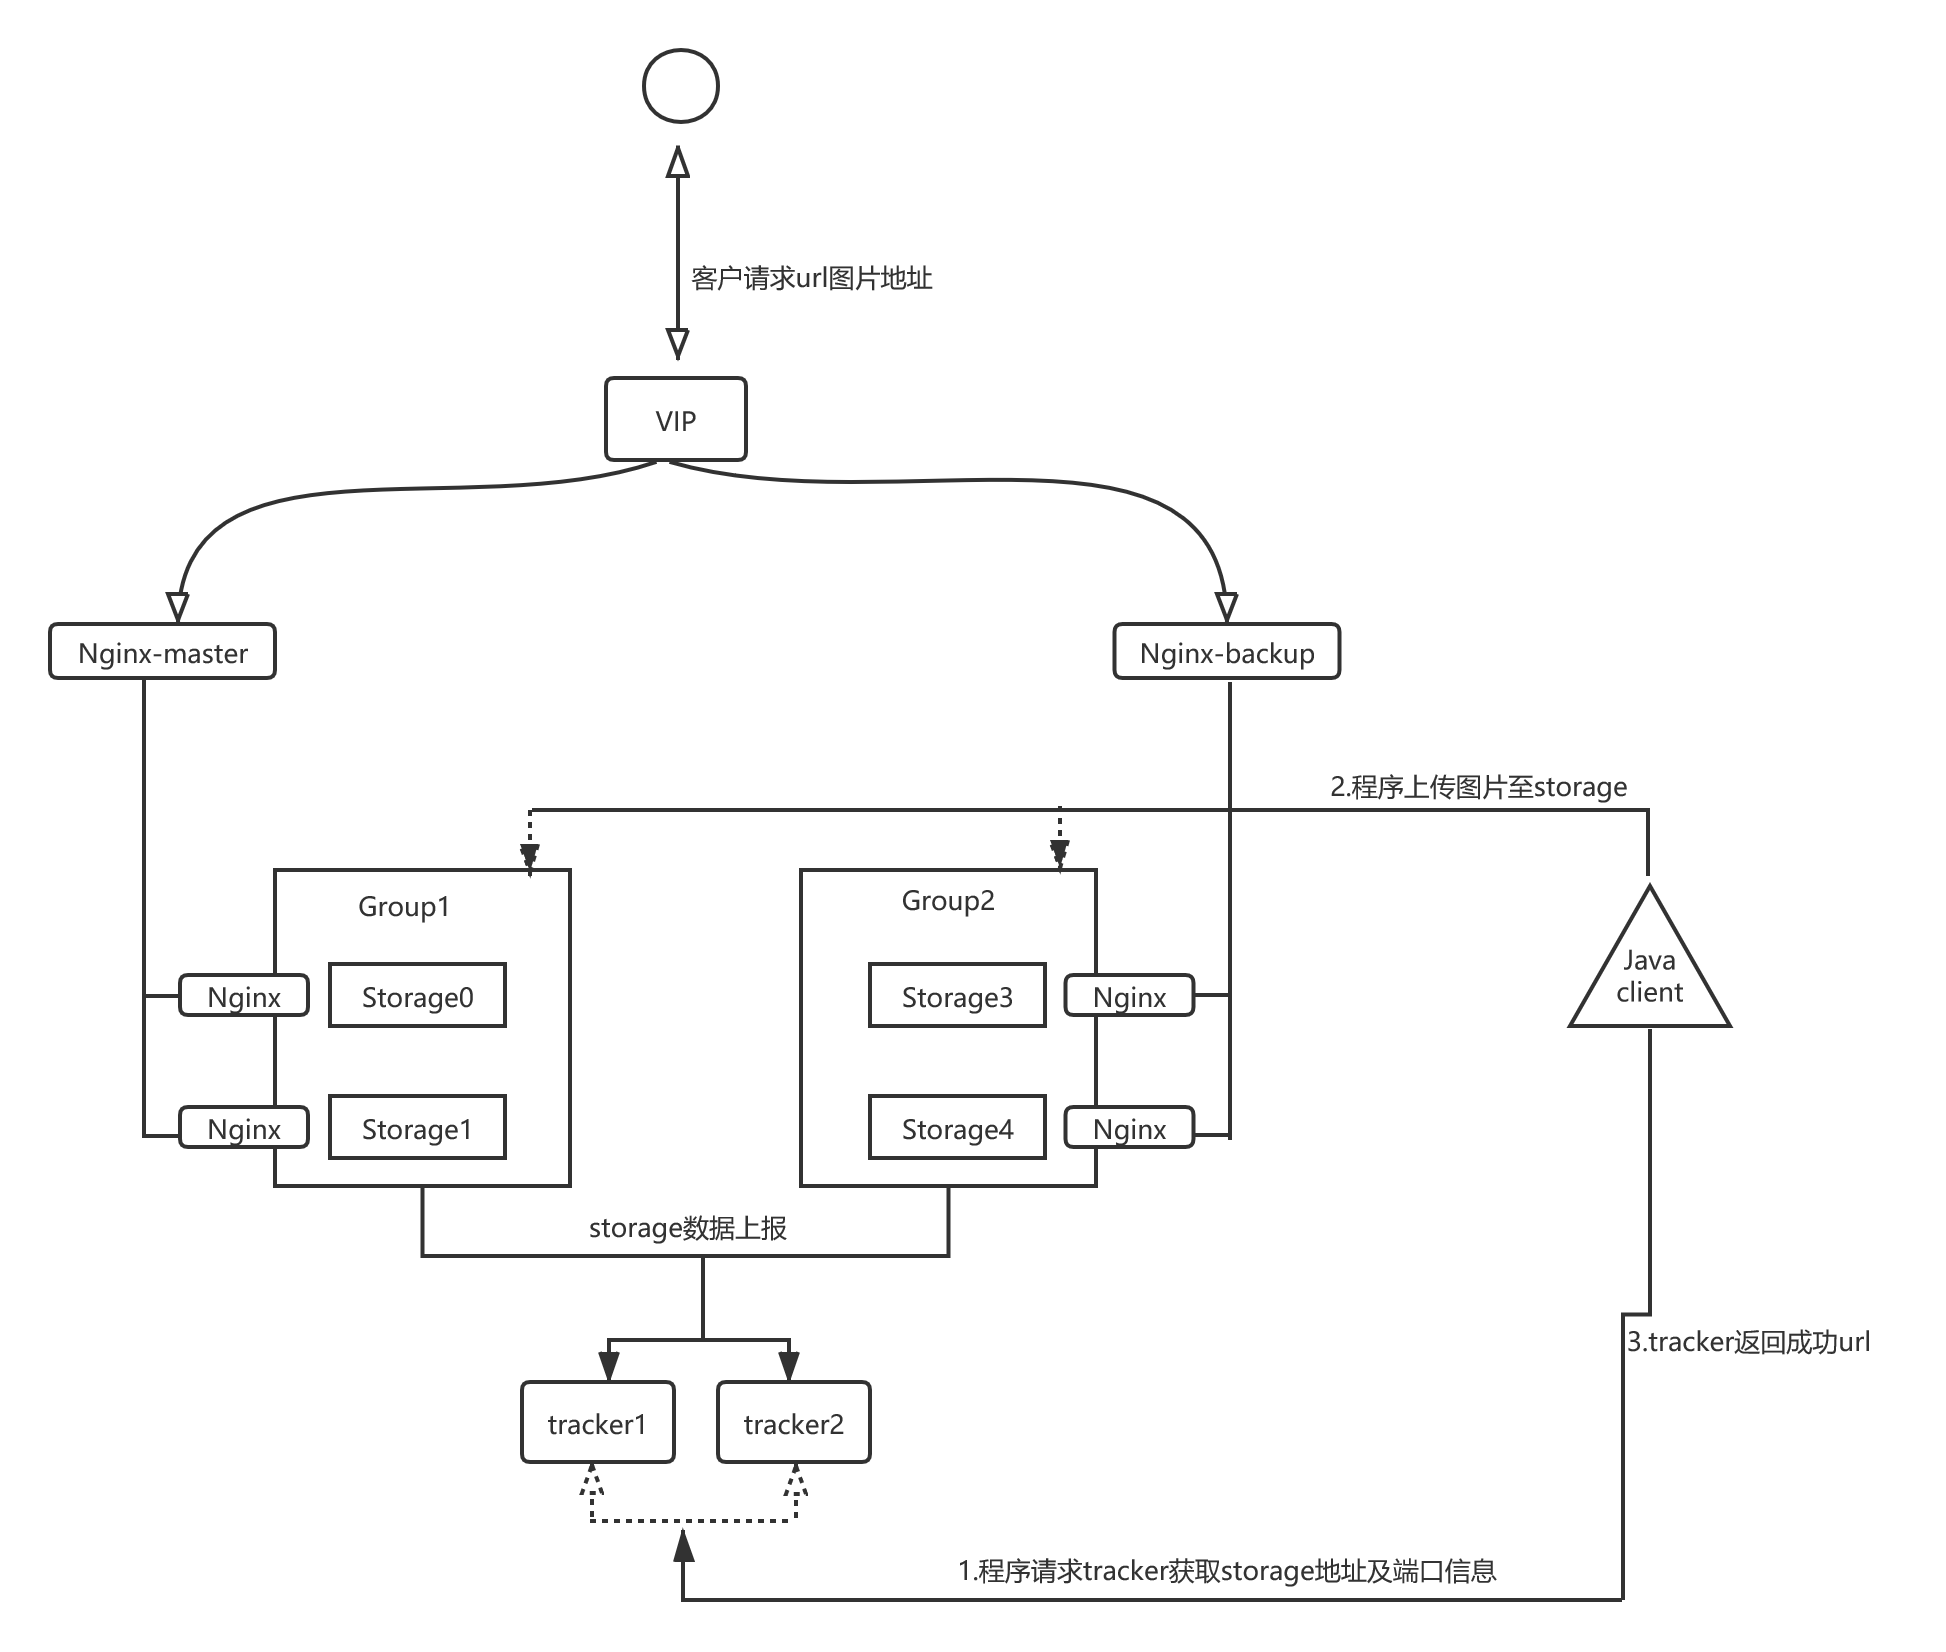
FastDFS架构包括两块Tracker Server、Storage Server。用户通过nginx服务访问图片,具体架构原理就不说了,用自带的二进制工具测试下就了解原理了。
# /usr/bin/fdfs_test /etc/fdfs/client.conf upload 图片文件名
官方文档: https://github.com/happyfish100/fastdfs
1.2集群架构介绍
二、Tracker部署
2.1资源服务器信息
以下配置来源于两个文档汇总,中间安装可能会出现一些误差。
Tracker1 192.168.1.109:22122 CentOS
Tracker2 192.168.1.110:22122 CentOS
Group1-Storage0 192.168.1.111:23000 CentOS
Group1-Storage1 192.168.1.112:23000 CentOS
Group2-Storage0 192.168.1.113:23001 CentOS
Group2-Storage1 192.168.1.114:23001 CentOS
nginx1+keepalived 192.168.1.30 CentOS
nginx2+keepalived 192.168.1.40 CentOS
VIP 192.168.1.35
2.2安装Tracker
# yum install libevent-devel gcc gcc-c++
# 安装libfastcommon
[root@xiangys01 ~]# tar -zxvf libfastcommon-1.0.7.tar.gz
[root@xiangys01 ~]# cd libfastcommon-1.0.7
[root@xiangys01 libfastcommon-1.0.7]# ./make.sh
[root@xiangys01 libfastcommon-1.0.7]# ./make.sh install

# 安装fastdfs
[root@xiangys01 ~]# tar -zxvf FastDFS_v5.05.tar.gz
[root@xiangys01 ~]# cd FastDFS
[root@xiangys01 FastDFS]# ./make.sh
[root@xiangys01 FastDFS]# ./make.sh install
备注:上面的程序版本有些老了,新安装可能会出现一些异常,如果要安装的话可自行查询下文档进行安装,也可以参考作者的dockerfile文档,地址如下:
https://github.com/happyfish100/fastdfs/blob/master/docker/dockerfile_local/Dockerfile
三、 配置Tracker
无论是配置tracker还是配置storage上面的安装步骤都是必须的,而tracker和storage的区别主要是安装完fastdfs之后的配置过程。
3.1tracker资源信息
Tracker1 192.168.1.109:22122 CentOS
Tracker2 192.168.1.110:22122 CentOS
3.2配置文件
[root@xiangys01 FastDFS]# cd /etc/fdfs/
[root@xiangys0134 fdfs]# cp tracker.conf.sample tracker.conf
[root@xiangys0134 fdfs]# mkdir -p  /opt/fastdfs_tracker
[root@xiangys0134 fdfs]# vi /etc/fdfs/tracker.conf
disabled=false                                              #启用配置文件
port=22122                                                  #设置tracker的端口号
base_path=/opt/fastdfs_tracker                              #设置tracker的数据文件和日志目录
3.3 启动tracker
[root@xiangys0134-109 fdfs]# /etc/init.d/fdfs_trackerd start
3.4 查看tracker日志
tail -100 /opt/fastdfs_tracker/logs/trackerd.log
四、配置Storage
4.1 Group1资源信息
Group1-Storage0 192.168.1.111:23000 CentOS
Group1-Storage1 192.168.1.112:23000 CentOS
4.2配置文件
[root@xiangys0134 fdfs]# cp storage.conf.sample storage.conf
[root@xiangys0134 fdfs]# vi /etc/fdfs/storage.conf
disabled=false                                                           #启用配置文件
group_name=group1                                                #组名,根据实际情况修改
port=23000                                                                 #设置storage的端口号,默认是23000,同一个组的storage端口号必须一致
base_path=/opt/fastdfs_storage_info                      #设置storage的日志目录(需预先创建)
store_path_count=1                                                    #存储路径个数,需要和store_path个数匹配
store_path0=/opt/fastdfs_storage_data                   #存储路径
tracker_server=192.168.1.109:22122                     #tracker服务器的IP地址和端口号
tracker_server=192.168.1.110:22122                     #tracker服务器的IP地址和端口号
http.server_port=8888                                              ##storage提供的服务端口不变,后面需要用nginx代理这个端口
4.3 启动storage
[root@xiangys0134 fdfs]# /etc/init.d/fdfs_storaged start
4.4查看storage日志
 #查看日志
 # tail -100 /opt/fastdfs_storage_info/logs/storaged.log

 #查看集群状态
 # /usr/bin/fdfs_monitor /etc/fdfs/storage.conf
4.5 Group2资源信息
Group2-Storage0 192.168.1.113:23001 CentOS
Group2-Storage1 192.168.1.114:23001 CentOS
4.6配置文件
[root@xiangys0134 fdfs]# cp storage.conf.sample storage.conf
[root@xiangys0134 fdfs]# vi /etc/fdfs/storage.conf
disabled=false                                                           #启用配置文件
group_name=group2                                                #组名,根据实际情况修改
port=23001                                                                 #设置storage的端口号,默认是23000,同一个组的storage端口号必须一致
base_path=/opt/fastdfs_storage_info                      #设置storage的日志目录(需预先创建)
store_path_count=1                                                    #存储路径个数,需要和store_path个数匹配
store_path0=/opt/fastdfs_storage_data                   #存储路径
tracker_server=192.168.1.109:22122                     #tracker服务器的IP地址和端口号
tracker_server=192.168.1.110:22122                     #tracker服务器的IP地址和端口号
http.server_port=8888                                              ##storage提供的服务端口不变,后面需要用nginx代理这个端口
五、Storage配置nginx
5.1介绍
默认的是没台storage服务器只开启一个组,fastdfs-nginx-module模块功能为防止客户在访问的同时因为其他同组下的storage服务器没有文件同步。本地nginx通过端口8888访问storage图片
5.2nginx组件资源
tengine-2.1.2.tar.gz
fastdfs-nginx-module_v1.16.tar.gz
5.3nginx源码编译
[root@xiangys-fastdfs01 ~]# tar -zxvf fastdfs-nginx-module_v1.16.tar.gz
[root@xiangys-fastdfs01 ~]# cd tengine-2.1.2
./configure \
--user=www \
--group=www \
--prefix=/mnt/tengine/tengine-2.1.2 \
--with-http_stub_status_module \
--with-pcre \
--with-http_ssl_module \
--with-http_gzip_static_module \
--with-http_realip_module \
--with-http_upstream_check_module \
--add-module=/root/fastdfs-nginx-module/src \
--with-ipv6

[root@xiangys-fastdfs01 tengine-2.1.2]# make && make install
5.4 nginx 配置文件
[root@xiangys0134-109 conf]# vi nginx.conf
user  www www;
worker_processes  1;
pid /mnt/tengine/tengine-2.1.2/nginx.pid;
worker_rlimit_nofile 65535;
events {
    use epoll;
    worker_connections 2048;
}
http {
    include       mime.types;
    default_type  application/octet-stream;
    sendfile        on;
    tcp_nopush     on;
    keepalive_timeout  65;

    server_names_hash_bucket_size 128;
    client_header_buffer_size 32k;
    large_client_header_buffers 4 32k;
    client_max_body_size 300m;
    proxy_redirect off;
    proxy_set_header Host $http_host;
    proxy_set_header X-Real-IP $remote_addr;
    proxy_set_header X-Forwarded-For $proxy_add_x_forwarded_for;
    proxy_connect_timeout 90;
    proxy_send_timeout 90;
    proxy_read_timeout 90;
    proxy_buffer_size 16k;
    proxy_buffers 4 64k;
    proxy_busy_buffers_size 128k;
    proxy_temp_file_write_size 128k;

    keys_zone=http-cache:500m max_size=10g inactive=30d;

    server {
       listen       8888;
       server_name  store.xinnigegui.com;
       location ~/group([1-9])/M00{
                 root /opt/fastdfs_storage_data/data;
                 ngx_fastdfs_module;
             }
       error_page  404              /mnt/tengine/tengine-2.1.2/html/404.html;
       error_page   500 502 503 504  /50x.html;
       location = /50x.html {
             root   html;
                }
          }
}
六、Nginx代理配置
6.3介绍
前端服务器进行代理后端服务器端口8888进行获取http的图片地址
6.2配置文件
[root@Load conf]# cat nginx.conf
worker_processes  4;
#worker_cpu_affinity 00000001 00000010 00000100 00001000 00010000 00100000 01000000 10000000;
user  www www;
pid /mnt/tengine/tengine-2.1.2/nginx.pid;
worker_rlimit_nofile 65535;
events {
    use epoll;
    worker_connections 2048;
}
http {
    include       mime.types;
    default_type  application/octet-stream;
    sendfile        on;
    keepalive_timeout  65;
    access_log off;
    error_log logs/error.log notice;
    log_format  main  '$remote_addr - $remote_user [$time_local] "$request" '
                      '$status $body_bytes_sent "$http_referer" '
                     '"$http_user_agent" "$http_x_forwarded_for"$request_time"';

    server_names_hash_bucket_size 128;
    client_header_buffer_size 32k;
    large_client_header_buffers 4 32k;
    client_max_body_size 300m;
    tcp_nopush      on;

    server_tokens   off;
    client_body_buffer_size 512k;
    proxy_connect_timeout 60;
    proxy_read_timeout    600;
    proxy_send_timeout    600;
    proxy_buffering off;
    proxy_buffer_size     16k;
    proxy_buffers         4 64k;
    proxy_busy_buffers_size 128k;
    proxy_temp_file_write_size 128k;
    #inactive=1d;
    keys_zone=http-cache:500m max_size=10g inactive=30d;

    gzip on;
    gzip_min_length 1k;
    gzip_buffers 4 16k;
    gzip_http_version 1.1;
    gzip_comp_level 2;
    gzip_types text/plain application/x-javascript text/css application/xml;
    gzip_vary   on;
    limit_conn_zone $binary_remote_addr zone=perip:50m;

    upstream fdfs_group1 {
         server 192.168.1.111:8888 weight=1 max_fails=2 fail_timeout=30s;
         server 192.168.1.112:8888 weight=1 max_fails=2 fail_timeout=30s;
         server 192.168.1.113:8888 weight=1 max_fails=2 fail_timeout=30s;
         server 192.168.1.114:8888 weight=1 max_fails=2 fail_timeout=30s;
    }

    server {
        listen       80;
        server_name  store.xinnigegui.com;

        location ~/group([1-9])/M00 {
            proxy_next_upstream http_502 http_504 error timeout invalid_header;
            proxy_cache http-cache;
            proxy_cache_valid  200 304 12h;
            proxy_cache_key $uri$is_args$args;
            proxy_pass http://fdfs_group1;
            expires 30d;
        }

        location ~/purge(/.*) {
            allow 127.0.0.1;
            allow 192.168.1.0/24;
            deny all;
            proxy_cache_purge http-cache  $1$is_args$args;
        }

        error_page   500 502 503 504  /50x.html;
        location = /50x.html {
            root   html;
        }
      }

  server {
          listen       80  default_server;
          server_name  _;
          access_log   off;
          return       444;
          }

 }

留言