
一、配置基础环境
1.1 hostname及hosts解析调整
[root@k8s-master ~]# hostname
k8s-master

[root@k8s-node1 ~]# hostname
k8s-node1

[root@k8s-node2 ~]# hostname
k8s-node2

[root@k8s-master ~]# ping k8s-master
PING iZwz905hgfqd5255uj9hcpZ (172.20.88.35) 56(84) bytes of data.
64 bytes from iZwz905hgfqd5255uj9hcpZ (172.20.88.35): icmp_seq=1 ttl=64 time=0.013 ms
64 bytes from iZwz905hgfqd5255uj9hcpZ (172.20.88.35): icmp_seq=2 ttl=64 time=0.024 ms

[root@k8s-node1 ~]# ping k8s-node1
PING iZwz905hgfqd5255uj9hcqZ (172.20.88.34) 56(84) bytes of data.
64 bytes from iZwz905hgfqd5255uj9hcqZ (172.20.88.34): icmp_seq=1 ttl=64 time=0.013 ms
64 bytes from iZwz905hgfqd5255uj9hcqZ (172.20.88.34): icmp_seq=2 ttl=64 time=0.024 ms

[root@k8s-node2 ~]# ping k8s-node2
PING iZwz905hgfqd5255uj9hcrZ (172.20.88.33) 56(84) bytes of data.
64 bytes from iZwz905hgfqd5255uj9hcrZ (172.20.88.33): icmp_seq=1 ttl=64 time=0.012 ms
64 bytes from iZwz905hgfqd5255uj9hcrZ (172.20.88.33): icmp_seq=2 ttl=64 time=0.021 ms
1.2 关闭虚拟内存
# swapoff -a; echo vm.swappiness = 0 >> /etc/sysctl.conf; sysctl -p
1.3 linux内核升级
官方推荐使用ipvs时采用内核为4.19及更高版本,以下操作需每台机器都需要操作
- 查看当前版本
# yum list kernel
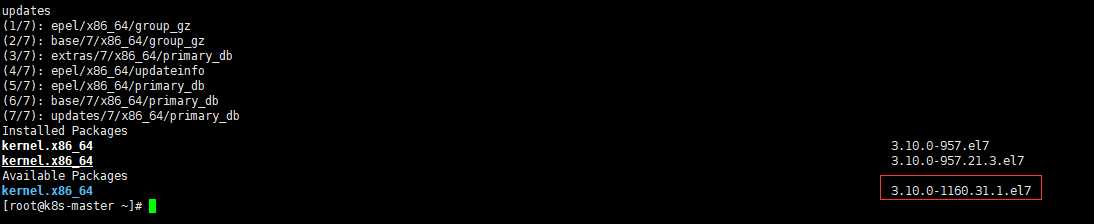
- 升级内核小版本
备注:这里存在疑问是否是直接跳过升级小版本内核去升级4.19版本内核还是先升级小版本内核再升级大版本内核
# yum update kernel -y
- 检查并启动
# init 6
- 升级大版本
参考文档:http://elrepo.org/tiki/HomePage
# rpm --import https://www.elrepo.org/RPM-GPG-KEY-elrepo.org
# rpm -Uvh https://elrepo.org/linux/kernel/el7/x86_64/RPMS/elrepo-release-7.0-5.el7.elrepo.noarch.rpm
# yum --disablerepo=\* --enablerepo=elrepo-kernel repolist            /载入元数据
# yum --disablerepo=\* --enablerepo=elrepo-kernel list kernel*        /查看可用的rpm包,官方最新内核版本为5.13
# yum --disablerepo=\* --enablerepo=elrepo-kernel install  kernel-ml.x86_64  -y        /安装最新版本
# yum remove kernel-tools-libs.x86_64 kernel-tools.x86_64  -y        /删除旧版本工具包
# yum --disablerepo=\* --enablerepo=elrepo-kernel install kernel-ml-tools.x86_64  -y    /安装新版本工具包
# grep "^menuentry" /boot/grub2/grub.cfg | cut -d "'" -f2    /查看内核的版本
# grub2-editenv list        /查看当前系统实际启动的内核版本仍然为3.10
# grub2-set-default 'CentOS Linux (5.13.2-1.el7.elrepo.x86_64) 7 (Core)'    /设置内核的默认启动顺序

# init 6
# uname -a
1.4 系统初始化
可选操作,初始化脚本参考:https://raw.githubusercontent.com/xiangys0134/deploy/master/%E7%B3%BB%E7%BB%9F%E5%88%9D%E5%A7%8B%E5%8C%96/init.sh
1.5 安装ipvs
以下机器每台都需要安装
# yum install ipvsadm -y
1.6 内核参数修改
br_netfilter模块加载
查看br_netfilter模块:
lsmod |grep br_netfilter
如果系统没有br_netfilter模块则执行下面的新增命令,如有则忽略。
- 永久新增br_netfilter模块
# cat > /etc/rc.sysinit << EOF
#!/bin/bash
for file in /etc/sysconfig/modules/*.modules ; do
[ -x \$file ] && \$file
done
EOF

# cat > /etc/sysconfig/modules/br_netfilter.modules << EOF
modprobe br_netfilter
EOF

# chmod 755 /etc/sysconfig/modules/br_netfilter.modules
# chmod 755 /etc/rc.sysinit
# echo "/etc/rc.sysinit" >> /etc/rc.local
# chmod +x /etc/rc.d/rc.local
# /etc/rc.sysinit
- 内核参数永久修改
备注:初始化脚本后此内核已经做了优化以下步骤不需要执行
# cat < /etc/sysctl.d/k8s.conf
net.bridge.bridge-nf-call-ip6tables = 1
net.bridge.bridge-nf-call-iptables = 1
EOF

# sysctl -p /etc/sysctl.d/k8s.conf
net.bridge.bridge-nf-call-ip6tables = 1
net.bridge.bridge-nf-call-iptables = 1
备注:截止2021.7.19日官方给到的最新内核默认已经是5.13版本,发现内核没有包含br_netfilter这个模块查看命令ls -alRUv /lib/modules/$(uname -r)/kernel|grep br_netfilter。这个问题持续关注中。关于模块参考信息见文档:https://kubernetes.io/zh/docs/setup/production-environment/tools/kubeadm/install-kubeadm/
二、安装Docker
可修改需要安装的版本version=’20.10.7′
脚本参考链接:https://github.com/xiangys0134/deploy/blob/master/software_install/docker/docker_install.sh
三、安装kubelet
每个节点都需要配置和安装
3.1 配置源
[root@master ~]# cd /etc/yum.repos.d/
[root@localhost yum.repos.d]# vi k8s.repo
添加如下内容:
[kubernetes]
name=Kubernetes Repo
baseurl=https://mirrors.aliyun.com/kubernetes/yum/repos/kubernetes-el7-x86_64/
gpgcheck=1
gpgkey=https://mirrors.aliyun.com/kubernetes/yum/doc/rpm-package-key.gpg
enabled=1

[root@localhost ~]# rpm --import https://mirrors.aliyun.com/kubernetes/yum/doc/rpm-package-key.gpg
3.2 查看release版本
# yum list --showduplicates kubeadm --disableexcludes=kubernetes

3.3 安装kubeadm
# yum install kubelet-1.21.2 kubeadm-1.21.2 kubectl-1.21.2 -y
3.4 查看相关依赖服务
# kubeadm config images list --kubernetes-version=v1.21.2
k8s.gcr.io/kube-apiserver:v1.21.2
k8s.gcr.io/kube-controller-manager:v1.21.2
k8s.gcr.io/kube-scheduler:v1.21.2
k8s.gcr.io/kube-proxy:v1.21.2
k8s.gcr.io/pause:3.4.1
k8s.gcr.io/etcd:3.4.13-0
k8s.gcr.io/coredns/coredns:v1.8.0
3.5 下载镜像
# vi image.sh
#!/bin/bash
url=xiangys0134
version=v1.21.2
images=(`kubeadm config images list --kubernetes-version=$version|awk -F 'k8s.gcr.io/' '{print $NF}'`)
for imagename in ${images[@]} ; do
  conedns_num=`echo "${imagename}" |grep "coredns"|wc -l`
  if [ $conedns_num -eq 1 ]; then
    sourceimage=${imagename##*/}
  else
    sourceimage=${imagename}
  fi
  docker pull $url/$sourceimage
  docker tag $url/$sourceimage k8s.gcr.io/$imagename
  docker rmi -f $url/$sourceimage
done

# bash -x image.sh
四、集群配置
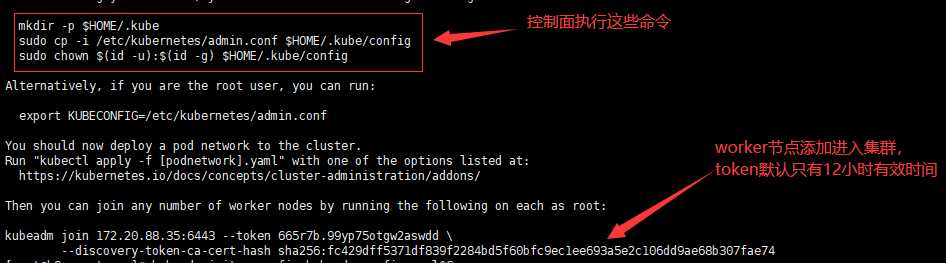
4.1 控制面初始化
参考文档:https://kubernetes.io/zh/docs/reference/setup-tools/kubeadm/kubeadm-init/
ipvs开启参考文档:https://github.com/kubernetes/kubernetes/blob/master/pkg/proxy/ipvs/README.md
[root@k8s-master ~]# vi kubeadm-config.yaml
apiVersion: kubeadm.k8s.io/v1beta2
kind: ClusterConfiguration
kubernetesVersion: v1.21.2
kubeProxy:
  config:
    mode: ipvs
networking:
  podSubnet: "10.244.0.0/16"

[root@k8s-master ~]# kubeadm init --config kubeadm-config.yaml
4.2 验证是否开启ipvs
[root@k8s-master ~]# kubectl get svc --all-namespaces

[root@k8s-master ~]# ipvsadm -ln

备注:这样没使用到ipvs的一个原因我觉得还是因为br_netfilter模块。因为现在没有4.19+的内核进行验证,所以这个问题需要后续跟踪。
4.3 worker节点加入进集群
# kubeadm join 172.20.88.35:6443 --token 665r7b.99yp75otgw2aswdd \
    --discovery-token-ca-cert-hash sha256:fc429dff5371df839f2284bd5f60bfc9ec1ee693a5e2c106dd9ae68b307fae74

...
[preflight] FYI: You can look at this config file with 'kubectl -n kube-system get cm kubeadm-config -o yaml'
[kubelet-start] Writing kubelet configuration to file "/var/lib/kubelet/config.yaml"
[kubelet-start] Writing kubelet environment file with flags to file "/var/lib/kubelet/kubeadm-flags.env"
[kubelet-start] Starting the kubelet
[kubelet-start] Waiting for the kubelet to perform the TLS Bootstrap...

This node has joined the cluster:
* Certificate signing request was sent to apiserver and a response was received.
* The Kubelet was informed of the new secure connection details.

Run 'kubectl get nodes' on the control-plane to see this node join the cluster.
备注:日志表示加入集群成功,执行命名需根据控制面init后的token值进行加入集群操作
4.4 查看集群
[root@k8s-master ~]# kubectl get nodes

4.5 安装flannel插件
参考文档:https://github.com/flannel-io/flannel
[root@k8s-master ~]# kubectl apply -f https://raw.githubusercontent.com/coreos/flannel/master/Documentation/kube-flannel.yml

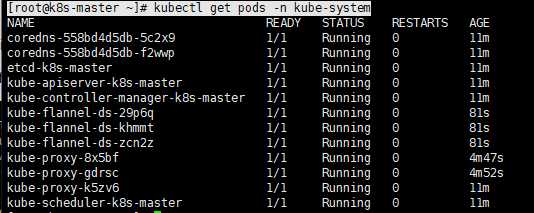
4.6 查看资源对象
[root@k8s-master ~]# kubectl get pods -n kube-system
[root@k8s-master ~]# kubectl get node

五、NAS存储配置
5.1 安装nfs
# yum install -y nfs-utils
备注:每个节点均需要安装,服务只在某台机器上启动即可,生产环境可以考虑生产厂商nas或者自建分布式存储
5.2 服务配置
[root@k8s-node2 ~]# mkdir /data/nfs/sc -p        /创建nfs服务存储目录
[root@k8s-node2 ~]# vi /etc/exports
添加如下内容
/data/nfs/sc 172.20.0.0/16(rw,no_root_squash)

[root@k8s-node2 ~]# systemctl enable nfs
[root@k8s-node2 ~]# systemctl restart nfs
5.3 验证nfs是否支持挂载
[root@k8s-node1 ~]# showmount -e 172.20.88.33

六、配置StorageClass
官方参考文档:https://github.com/kubernetes-sigs/nfs-subdir-external-provisioner
6.1下载配置清单
网页版下载,如下载不成功则先下载至本地再传输至服务器中
[root@k8s-master nfs-pods]# wget https://github.com/kubernetes-sigs/nfs-subdir-external-provisioner/releases/download/nfs-subdir-external-provisioner-4.0.12/nfs-subdir-external-provisioner-4.0.12.tgz

[root@k8s-master nfs-pods]# tar -zxvf nfs-subdir-external-provisioner-4.0.12.tgz
[root@k8s-master nfs-pods]# cd nfs-subdir-external-provisioner
[root@k8s-master nfs-subdir-external-provisioner]# vim values.yaml
修改一:
image:
  repository: xiangys0134/nfs-subdir-external-provisioner

修改二:
nfs:
  server: 172.20.88.33
  path: /data/nfs/sc

修改三:
reclaimPolicy: Retain

[root@k8s-master nfs-subdir-external-provisioner]# helm upgrade -i nfs-provisioner -n kube-system .        /安装
6.2 测试StorageClass
[root@k8s-master nfs-pods]# vi test-claim.yaml
kind: PersistentVolumeClaim
apiVersion: v1
metadata:
  name: test-claim
  annotations:
    volume.beta.kubernetes.io/storage-class: "nfs-client"
spec:
  accessModes:
    - ReadWriteMany
  resources:
    requests:
      storage: 1000Mi

[root@k8s-master tmp]# kubectl apply -f test-claim.yaml
备注:之后多一个pod就可以多写一个pvc,完成自动绑定,但是不能起一样的名字”test-claim”
6.3 通过pod测试
[root@k8s-master tmp]# vi test-pod.yaml
kind: Pod
apiVersion: v1
metadata:
  name: test-pod
spec:
  containers:
  - name: test-pod
    image: busybox
    command:
      - "/bin/sh"
    args:
      - "-c"
      - "touch /mnt/SUCCESS && exit 0 || exit 1"
    volumeMounts:
      - name: nfs-pvc
        mountPath: "/mnt"
  restartPolicy: "Never"
  volumes:
    - name: nfs-pvc
      persistentVolumeClaim:
        claimName: test-claim

[root@k8s-master tmp]# kubectl apply -f test-pod.yaml
七、配置默认sc
参考文档:https://kubernetes.io/zh/docs/tasks/administer-cluster/change-default-storage-class/
[root@k8s-master tmp]# kubectl get sc
[root@k8s-master tmp]# kubectl patch storageclass nfs-client -p '{"metadata": {"annotations":{"storageclass.kubernetes.io/is-default-class":"true"}}}'

八、helm部署redis测试
[root@k8s-master tmp]# helm repo add apphub https://apphub.aliyuncs.com
[root@k8s-master tmp]# helm upgrade -i test-redis apphub/redis
[root@k8s-master tmp]# kubectl get pvc

留言